Recipe: The Best Carmelitas You've Ever Had

Guys, how obnoxious is my recipe title? This overly dramatic title is inspired by what pops up every time I Google any recipe. Every dumbo names their recipe “the best blady-blah,” but the problem with that is, who the devil do you trust?! No one. Well, except me of course. Y’all can trust me. But hey, better to be safe and try these out for yourself, eh?

So lets talk Carmelitas. They are the perfect cross between cookie and bar. The breakdown is this: semi-sweet chocolate, toasted walnuts and homemade caramel sandwiched between an oatmeal cookie (minus the raisins, which are the devil). Yessssplease.

Few notes before diving in:
• These puppies are especially delish the second day, so if you can, make these ahead of time - the flavors noticeably have more depth.
• Regarding the homemade caramel, I promise it’s not as daunting as you might think it is. However, if you’re still scrrd and can’t get around your sccrrdness, buy a jar of it <cough> quitter. But I believe in you!
• I highly recommend eating these with a cup of Joe, it is so choice.

Enjoy fellow fiends!

The Best Carmelitas You’ve Ever Had

Ingredients
1 cup all-purpose flour
1/2 teaspoon baking soda
1 cup quick cooking oats
3/4 cup packed brown sugar
3/4 cup melted butter
1/4 teaspoon salt
6 ounces semisweet chocolate chips
1/2 cup chopped walnuts
3 tablespoons all-purpose flour
3/4 cup caramel (3/4 cup sugar, 1/4 cup water, 1/4 cup heavy whipping cream, 1 teaspoon salt)

Directions
For the caramel
1.  Combine the sugar and water in a small heavy-bottomed saucepan. This is the only time you can stir the sugar. If you stir it while it's cooking, it turns to rock candy. Place the saucepan over medium to low heat until the sugars start to dissolve, 5–8 mins. Then turn the heat up to medium-high and cook until the sugar starts to caramelize, 5 to 7 minutes.
2.  When the caramel starts to smoke, turn off the heat. Slowly add the cream and careful not to splatter yourself. Don't panic - the cream will bubble violently, and the caramel will solidify. Just give it more time to liquefy again-trust me!
3.  Simmer over medium-low heat, stirring constantly, until the caramel dissolves and the sauce is smooth, about 5–10 minutes. Pro Tip: Use an oven mitt with the stir-hand for safety.
4.  Stir in salt. Sauce will thicken as it sits.

For the bars
1. Preheat oven to 350 degrees F (175 degrees C). Grease one 9x9 inch square pan.
2. Roughly chop and toast the walnuts for 8 mins or until toasted. Pro Tip: It’s done when you start to smell the toasty nuts.
3. Combine the 1 cup flour, baking soda, oats, brown sugar, salt and melted butter. Mix to combine, mixture will be very crumbly. Press half of the mixture into the bottom of the prepared pan.
4. Bake at 350 degrees F (175 degrees C) for 10 minutes.
5. Let cool slightly then sprinkle over the crust the chocolate chips and nuts. Mix the caramel with the 3 tablespoons of flour and drizzle over the chocolate chips. Top with the remaining oatmeal mixture.
6. Bake at 350 degrees F (175 degrees C) for 15 minutes. Let bars cool before cutting.

Note: This is my personal pref, but I’d scale back on how much caramel you put on. I think it would be plenty sweet with a skosh less. The leftovers you have will go swimmingly on top of vanilla ice cream. Just sayin’.

Recipe: Summertime Strawberry Lemon Parfaits

Strawberry_Lemon_Parfeit_Recipe_Summer_Parfeits_Best_Strawberry_Dessert_Easy_Strawberry_Lemon_Dessert_Layered_Dessert_Dessert_Fiend.JPG

As far as the summer fruit lineup goes, strawberries are really calling my name these days. They're on point or "on fleek" as the millennials are saying. Whether you're snagging a basket at a corner market or farmer's market, they're looking mighty fine wherever you go.

I've been dabbling in all the fruity delights lately- I made a fruit galette, pie, jam and ice cream, but hadn't yet made a legit fruit parfait. After some light googling, I landed on this stellar looking strawberry lemon parfait recipe that really lured me in. I loved the contrast of tart lemon to sweet strawberry. In addition, it had them nestled with other delicious friends - whipped cream and pound cake. Yass.

There are 4 different components going on with this dessert, which sounds time-consuming, but each item went swiftly. The most time consuming being the pound cake, simply because you have the blasted bake and cool time. Alas, I have pro tips for you in the directions on how you can shave off some time.

Fun(?) fact: you can make this dessert ahead of time- several hours or a day ahead - allowing the layers to spoon each other, upping their flavor.

Here's to taking full advantage of summer fruit while the gettin's good!

Strawberry Lemon Parfaits
Yield: 6 individual cups (about 150 ml each)

Ingredients - Pound Cake
Yield: 8 servings (more than you need for the parfait, feel free to half it if you want)
Recipe by Once Upon a Chef
3 tablespoons milk (any kind)
3 eggs
1-1/2 teaspoons vanilla extract
1-1/3 cups cake flour
3/4 cup sugar
3/4 teaspoon baking powder
1/4 teaspoon salt
13 tablespoons unsalted butter, softened

Ingredients - Lemon Curd
Yield/Note: makes 1.5 cups, BUT you only need 1 C for the parfait
Recipe by Pretty Simple Sweet
3 large eggs
3/4 cup granulated sugar
1 tablespoon lemon zest
1/2 cup freshly squeezed lemon juice (2-3 lemons for both zest and juice)
1/4 cup (1/2 stick) unsalted butter, cut into small pieces

Ingredients - Strawberries n' Cream
Recipe by Pretty Simple Sweet
2 cups chopped strawberries
2 tablespoons granulated sugar
1 cup heavy cream
2 tablespoons granulated sugar
1/2 teaspoon vanilla extract

Directions - Pound Cake
1.  Preheat oven to 350°F. Grease an 8-in x 4-in x 2½-inch loaf pan with butter or nonstick cooking spray. Dust with flour, shaking off any excess. 
2.  In a medium bowl, whisk together the milk, eggs, and vanilla until just combined.
3.  In the bowl of an electric mixer fitted with the paddle attachment (or with a hand mixer), place the flour, sugar, baking powder, and salt. Mix on low speed for about 30 seconds or until blended.
4.  Add the butter and half of the egg mixture. Mix on low speed until the dry ingredients are moistened. Increase the mixer speed to medium (high speed if using a hand mixer) and beat for one minute. Scrape down the sides of the bowl. Add the remaining egg mixture, in 2 separate additions, beating about 30 seconds after each addition to combine. Do not over-mix. (The batter may have a slightly curdled or grainy appearance -- that's okay.)
5.  Scrape the batter into the prepared pan and smooth the top with an offset spatula or the back of a spoon. 
6.  Bake for 50 to 55 minutes, or until the cake is golden brown and a toothpick inserted into the center of the cake comes out clean.
7.  Place the cake on a wire rack to cool for about 10 minutes. Then remove the cake from the pan and cool completely on a wire rack. Pro Tip: Wrap the warm cake well in plastic wrap and pop into fridge or freezer to cool faster.

Directions - Lemon Curd
1.  In a medium heatproof bowl, place eggs, sugar, lemon zest, and juice and whisk to combine. 
2.  Place the bowl over a saucepan of simmering water (bain-marie). 
3.  Once simmering, cook on medium-low heat, whisking constantly, until mixture becomes thick. If you have a thermometer, it should register 170F; otherwise, it should coat the back of a wooden spoon and leave a clear pass if you run your finger through it.
4.  Remove from heat and immediately strain mixture through a sieve (I skipped this because, lazy). 
5.  Add butter and whisk until completely melted and incorporated, and mixture is smooth.
6.  Press a piece of plastic wrap directly onto the surface of the curd to prevent a "skin" from forming, and refrigerate for at least 4 hours.

Directions - strawberries and cream
For the strawberries
Place the strawberries and 2 tablespoons sugar in a bowl and mix to combine. Let sit for 15 minutes at room temperature to let the strawberries macerate and release some of their juices.

For the whipped cream:
Using a mixer with a whisk attachment, whisk together heavy cream, 2 tablespoons sugar, and vanilla on high speed until medium peaks form.

Assembly! 
Place a few cake pieces at the bottom of the glasses. Spoon a dollop of the lemon curd on top, then the strawberries (with their juices), and then the whipped cream. Repeat the layering until you've reached the top, ending with whipped cream. If not serving immediately, cover and store in the refrigerator for several hours or overnight.

Recipe: Brown Butter Salted Caramel Snickerdoodles

I've recently started working at <an awesome> food consulting company a few months ago - working on the branding team. It's been a sweet mashup of my love of food and design. One of the perks is that I have a kickass source for anything food-related: my coworkers! They're a wealth of knowledge, not surprisingly, as most of them are food scientists for crying out loud! When I'm in need of inspiration or ideas on what to bake, they have an answer for me in 2.2. It's rad.

I needed a solid low-maintenance cookie recipe the other day, and my coworker with her Brown Butter Salted Caramel Snickerdoodles recipe came through for me. As soon as she said the magic words: "brown butter" it was game over. Brown butter is my boy! I also love me some 'doodles and desserts stuffed with more dessert.

Friends, it's time to up your Snickerdoodle game. Lets do this.

Note: This cookie can be stuffed with store-bought candy caramels or with homemade caramel if you're feeling like a baller.

Brown Butter Salted Caramel Snickerdoodles
Recipe from twopeasandtheirpod.com
Yield: about 3 dozen cookies

Ingredients
2 1/2 cups all-purpose flour
1 teaspoon baking soda
2 teaspoons cream of tartar
1/2 teaspoon ground cinnamon
1/2 teaspoon sea salt
1 cup unsalted butter, sliced
1 1/4 cup dark brown sugar
1/2 cup granulated sugar
1 large egg
1 egg yolk
1 tablespoon vanilla extract
1 tablespoon plain Greek yogurt
About 1 cup caramel squares, cut into 1/4’s

For Baller-Style Caramel
Note:
you're going to have a good amount leftover. Thoughts? Wrap individual pieces in waxed paper and you've got yourself some chewy caramel candies. Boom.
1/2 cup butter or margarine
8oz light brown sugar
7 ounce can sweetened condensed milk
1/2 cup light corn syrup
1 pinch salt
3/4 teaspoons vanilla extract

For Rolling the Cookies:
1/4 cup granulated sugar
2 teaspoons ground cinnamon
Sea salt, for sprinkling on top of cookies

Directions
For the Cookies
1.  In a medium bowl, Whisk together the flour, baking soda, cream of tartar, cinnamon, and salt. Set aside.
2.  To brown the butter, heat a thick-bottomed skillet on medium heat. Add the sliced butter, whisking frequently. Continue to cook the butter until melted. The butter will start to foam and browned specks will begin to form at the bottom of the pan. The butter should have a nutty aroma. Watch the butter carefully because it can go from brown to burnt quickly. Remove butter from the heat and let cool to room temperature.
3.  In the bowl of a stand mixer, combine the brown butter and sugars. Mix until blended and smooth. Beat in the egg, yolk, vanilla, and yogurt and mix until combined. Slowly add in the dry ingredients and mix until just combined.
4.  Form the dough in a ball and cover with plastic wrap. Chill in the refrigerator for at least 30 minutes. You can chill the dough overnight.
5.  When ready to bake, preheat the oven to 350 degrees F. Measure about 2 tablespoons of dough and roll into balls. Flatten the ball with the palm of your hand and place a piece of caramel in the center of the dough. Wrap the cookie dough around the caramel, making sure the caramel is completely covered with dough.
6.  In a small bowl, combine the cinnamon and sugar. Roll the balls in the cinnamon-sugar mixture. Place dough balls on a large baking sheet lined with parchment paper. Make sure the cookies are about 2 inches apart. Sprinkle the cookie tops generously with sea salt.
7.  Bake the cookies 8-10 minutes or until the edges of the cookies begin to turn golden brown. The centers will still be soft. Cool the cookies on the baking sheet for 2-3 minutes, or until set. Transfer cookies to a wire cooling rack and cool completely.

For the Homemade Caramel
1.  In a heavy bottomed saucepan over medium heat, combine the butter, brown sugar, sweetened condensed milk, corn syrup and salt.
2.  Bring to a boil, stirring constantly. Heat to between 234 and 240 degrees F (112 to 116 degrees C), or until a small amount of syrup dropped into cold water forms a soft ball that flattens when removed from the water and placed on a flat surface.
3.  Cook for 2 minutes at that temperature. Remove from the heat and stir in vanilla.
4.  Meanwhile, butter a baking pan. When the caramel is ready, pour into the buttered pan. Allow to cool completely at room temperature.
5.  Remove from the pan before cutting into squares.

Recipe: Key Lime Pie, minus the Key

Lets talk about Key Limes for a minute. Key Limes were grown commercially in the Florida Keys until a hurricane wiped out most of the groves in the 1920s. Farmers replaced them with the larger, seedless Persian limes you see more often in the U.S. I'm guessing that's why I came up empty when I tried to find these puppies at the store. Thanks a lot hurricane!

Now lets talk about limes for a minute. According to Wiki, there are 15 types of limes. FIFTEEN! I was actually startled by that number. I mean...I've been living my whole life thinking there were only like 3 types of limes that existed. I feel like a damn fool!

Well, since I couldn't find Key Limes specifically (along with any of the 13 others!) I decided to add some lime zest to the filling and garnish in order to crank up the tartness, because Key Limes are more acidic and tart.

Now that you have all this lime knowledge, it's time you baked a lime dessert, yes? Key or no Key, this pie is still worth your while!

Key Lime Pie
Recipe adapted from Mangrove Mama's
Yield: 1, 9 inch pie or 1, 10 inch tart

Ingredients
For the Crust
1/4 cup (1/2 stick) butter or margarine, melted
1 cup graham cracker crumbs
1 tablespoon sugar
1 1/2 teaspoons cinnamon

For the Filling
5 large egg yolks
1, 14-ounce can sweetened condensed milk
Juice from 6 to 8 Key limes (about 2/3 cup)

Garnish
Whipped cream
Lime zest

Directions
1.  Heat oven to 325°F.
2.  For the crust, mix butter, graham crackers, sugar, and cinnamon in a medium bowl. Press onto the bottom and up the sides of a 9-inch pie pan (or bottom of a 10-inch tart pan). Bake 8 minutes. Set aside; let cool completely.
3.  For the filling, beat yolks in a food processor fitted with whisk attachment or with a hand mixer, about 2 minutes. Add condensed milk to yolks; process or beat until incorporated. Add lime juice. Process 2 minutes; pour into pie shell.
4.  Bake until set, 10 to 15 minutes. Remove from oven; cool on a wire rack 1 hour.
5.  Refrigerate, covered with plastic wrap set directly on top of filling, at least 4 hours or overnight.
6.  Top with fresh whipped cream and lime zest.

VARIATION: Instead of whipped cream, you may top with meringue. Beat 5 egg whites until frothy. Stream in 1/4 cup sugar, beating constantly until stiff peaks. Spread over baked filling; bake at 325°F until meringue starts to brown, about 5 minutes.

Recipe: Whiskey and Rye Chocolate Chip Cookies

There are a lot of good, but not great cookie recipes out there. #deepthoughtsbycourtney Yes, that goes for lots of recipes in the universe, but lets stay on topic. It's rare for me to stumble upon a cookie recipe where I feel like it hit-it-out-of-the-ballpark. These Whiskey and Rye Chocolate Chip Cookies are one of these unicorns.

Firstly, lets talk size. I love that the recipe directs us to make the cookies BIG, like a two-handed cookie, which makes me swoon. Secondly, lets talk flavor. This puppy is perfectly well-balanced, my favorite parts being the rye flour, which gives it a subtle earthiness and the vanilla salt, an unexpected topper. I mean, why use regular old salt when you can make the world better by using vanilla salt?! I just want to sprinkle that shit on everything!

Best thing about this recipe? It was created by my fellow alumni from San Francisco Cooking School and can be found on bonappetit.com! Two thumbs the fuck up!

My <dorky> pastry hat is tipped to you guys!

Whiskey and Rye Chocolate Chip Cookies
Recipe by San Francisco Cooking School
Yield: 16 cookies

Ingredients
1 1/2 cups chocolate wafers (discs, pistoles, fèves; preferably 72% cacao), divided
2 cups all-purpose flour
1/2 cup rye flour (I used dark rye flour, but light is ok too!)
1/2 teaspoon baking soda
1 1/2 teaspoons kosher salt
3/4 cup (1 1/2 sticks) plus 1 tablespoon unsalted butter, room temperature
3/4 cup dark brown sugar
3/4 cup granulated sugar
1 large egg
1 1/2 teaspoons vanilla extract or vanilla paste
1 teaspoon bourbon
1 vanilla bean, split lengthwise
1 teaspoon flaky sea salt

Directions
1.  Pulse 3/4 cup chocolate wafers in a food processor until pea-sized pieces form OR chop into small pea-sized bits (what I did because I'm a lazy sack! Food processors are a pain in the ass to clean).
2.  Whisk all-purpose flour, rye flour, baking soda, and kosher salt in a medium bowl.
3.  Using an electric mixer on medium speed, beat butter, brown sugar, and granulated sugar in a large bowl, scraping down sides of bowl as needed, until light and fluffy, 3–4 minutes. Add egg, vanilla, and bourbon and beat until fully incorporated, about 1 minute. Reduce speed to low and slowly add dry ingredients, mixing just to blend. Fold in chopped chocolate and remaining chocolate wafers.
4.  Portion dough into 16 balls (about 1/4 cup each) and transfer to a rimmed sheet sheet as you go. Wrap tightly with plastic wrap and chill at least 3 hours or up to 1 day.
5.  Position rack in middle of oven and preheat to 350°. Scrape vanilla seeds into sea salt in a small bowl and mix to combine (save pod for another use).
6.  Divide dough balls between 2 parchment-lined baking sheets, spacing 3" apart. Flatten each ball to about 3/4" thick and sprinkle with vanilla salt.
7.  Bake cookies, rotating sheets halfway through, until golden brown around the edges, 14–18 minutes (cookies will firm up as they cool).
8.  Let cool slightly on baking sheets, then transfer to wire racks and let cool completely.

Galentine's Day Dessert

A good friend of mine threw a Galentine's Day party last week. a.k.a. a Valentine's Day for girlfriends which, quite frankly, sounds way more fun than just plain old Valentine's Day. Ammi right? She had a need for an array of tasty desserts for the occasion, so she kindly asked me to take on the job.

She and I brainstormed about the menu and color palate and decided on black and white and to incorporate some <classy, not cheesy> romantical hearts in the mix because, you know, Valentine's Day. As for the menu we landed on a Vegan Chocolate Cake, Chocolate Crinkle Cookies, Vegan Cashew TigerBark, Heart-Shaped Chocolate Sandwich Cookies and Cheesecake Bites with Chocolate Hearts. Nice little chocolate medley.

Luckily there were no baking disasters <whew!> and the party went off without a hitch. And may I just say, my friend knows how to throw a gorgeous party, holy cow. The other attendees were all fantastic too, all blogger gals doing amazingly creative things. #girlpower For more deets on the fabulous party and the fabulous attendees, check out my friend's blog post here.

If you're feeling like getting festive with your baking tomorrow, I've got 5 solid desserts for you to choose from. Whether you're baking for your lovah, a friend who you'd like to be your lovah or perhaps just for your platonic friend, any of these desserts is sure to light their whistle!

Vegan Cashew Tiger Bark
Recipe adapted from View From Great Island
Yield: 12-15 pieces

Dessert Fiend Note: these were the easiest dessert out of the bunch! Easy and pretty is a win-win if you ask me.

Ingredients
1, 12-ounce package (about 2 cups) white chocolate chips
1/3 cup cashew butter
1 cup dark chocolate chips

Directions
1.  Line a standard baking sheet with a silicone mat, parchment, or foil.
2.  Melt the white chocolate and the cashew butter in a bowl over a bain marie on low heat- make sure your water isn't boiling, just steamy so you don't burn your chocolate- and heat until smooth.
3.  Melt the dark chocolate chips in a bowl over a bain marie on low-medium heat until smooth.
4.  Pour the cashew butter mixture out onto the baking sheet. Spread it out with an offset spatula until it is approximately a 8x12 rectangle. Don't stress over the exact size, your bark can be as thick or thin as you like.
5.  Drizzle the dark chocolate over the cashew layer in long stripes.
6.  Take the pointed end of a chopstick and swirl the layers together. Pro tip: I followed this technique roughly and it did the job!
7.  Let the chocolate sit until completely firm or pop in the fridge to harden faster.
8.  When the bark is solid, remove it from the silicone or foil, and cut it into pieces. Keep chilled until ready to eat.

Pro Tip- To Cut Bark:
Using a chef's knife, dip it in a glass of hot water and wipe dry before cutting. Repeat every 2 cuts or so. Start by trimming the edges to square off and then I recommend using a ruler and lightly mark where your cuts will be so your squares are consistent in sizing.

Heart-Shaped Chocolate Sandwich Cookies
Yield: roughly 2 dozen sandwich cookies
Recipe adapted from Flour by Joanne Cheng

Dessert Fiend Note: Ever had gourmet Oreos®? Well these are it! These puppies require an extra hour to let the dough sit/chill so be sure to keep that in mind.

Ingredients – Cookies
1 cup (2 sticks/228 grams) unsalted butter, melted and cooled slightly
3/4 cup (150 grams) granulated sugar
1 teaspoon vanilla extract
1 cup (200 grams) semisweet chocolate chips, melted and cooled slightly
1 egg
1 1/2 cups (210 grams) unbleached all-purpose flour
3/4 cup (90 grams) Dutch-processed cocoa powder
1 teaspoon salt
1/2 teaspoon baking soda

Ingredients – Vanilla Cream Filling
1/2 cup (1 stick/114 grams) unsalted butter, softened
1 2/3 cups (230 grams) confectioners' sugar
1 teaspoon vanilla extract
1 tablespoon milk
Pinch of salt

Directions – Cookies
1.  In a medium bowl, whisk together the butter and granulated sugar until well combined. Whisk in the vanilla and chocolate. Add the egg and whisk until thoroughly incorporated.
2.  In another medium bowl, stir together the flour, cocoa powder, salt and baking soda. Using a wooden spoon, stir the flour mixture into the chocolate mixture.
3.  Divide the dough in half, and shape into two discs. Wrap in plastic wrap and refrigerate for 1 hour.
4.  Position a rack in the center of the oven, and heat the oven to 325 degrees. Line a baking sheet with parchment paper.
5.  Taking only one portion of dough out of the refrigerator at a time, turn the dough out onto a lightly floured surface. Pro Tip: Use your dutch-cocoa powder instead of flour, if you have some left, in order to retain the darkest color. Roll the dough to 1/8 – 1/4-inch thickness. Use a <heart> cookie cutter (approximately 2 inches in diameter) to cut out cookies and transfer them to the prepared baking sheet.
6.  Bake for 10-12 minutes, or until the cookies are firm to the touch. Check them frequently after 8 minutes, poking them in the middle. As soon as they feel firm to the touch, remove them from the oven. You can’t judge by color because they start out black.
7.  Let cool on the baking sheet on a wire rack to room temperature. While the cookies are cooling, make the frosting.

Directions – Filling
1.  Using a stand mixer fitted with the paddle attachment (or a handheld mixer), beat the butter on low speed for about 30 seconds, or until completely smooth and soft. Add the confectioners’ sugar and vanilla and beat until the mixture is perfectly smooth. Add the milk and salt and again beat until smooth.
2.  Scoop about 1 rounded tablespoon of the filling onto the bottom of 1 cookie. Top with a second cookie, bottom side down, then press the cookies together to spread the filling toward the edges. Pro Tip: I used a pastry bag which was a bit more controlled and faster, so use one if you have it!

Cheesecake Bites with Chocolate Hearts
Yield: 3 dozen

Dessert Fiend Note: This cheesecake recipe is an old favorite standby of mine. Also, feel free to half this recipe, unless you're looking to serve this to an army of cheesecake lovers.

Graham Crust
Recipe from Momofuku Milk Bar
Note: You will have extra crust but it freezes beautifully!

Ingredients - Crust
370 g (3 cups) graham cracker crumbs
40 g (1/2 cup) milk powder
50 g (4 tbs) sugar
6 g (1 1/2 tsp) kosher salt
110 g (8 tbs) butter, melted, or as needed
110 g (1/2 cup) heavy cream

Ingredients - Filling
5 large eggs, room temperature
2 cups (one pint) sour cream, room temperature
4, 8-ounce packages cream cheese, room temperature
8 tablespoons (one stick) unsalted butter, room temperature
1 1/2 cups sugar
2 tablespoons cornstarch
1 1/2 teaspoons vanilla extract
Chocolate Sauce (store-bought or make my version here)

Directions - Crust
1.  Preheat oven to 300 degrees.
2.  Toss the graham crumbs, milk powder, sugar and salt with your hands in a medium bowl to evenly distribute your dry ingredients.
3.  Whisk the butter and heavy cream together. Add to the dry ingredients and toss again to evenly distribute.
4.  Scoop about 1 tablespoon of mixture into each muffin tin and pack it down using the back of the tablespoon or a fork.
5.  Bake for 5ish minutes until the crust starts to set. Cool on wire rack while you make the filling.

Directions - Filling
1.  Position the baking rack in the center of the oven; preheat the oven to 325 degrees. Line muffin tins with paper liners.
2.  In a large mixing bowl, using an electric mixer, beat the eggs with the sour cream until well blended.
3.  In a medium-sized bowl, beat the cream cheese with the butter until smooth and creamy. Add this to the egg-sour cream mixture and beat until smooth. 
4.  Add the sugar, cornstarch, vanilla and beat thoroughly, about 2 minutes. 
5.  Pour batter into tins until about ¾ of the way full.
6.  Drop 2 dots of chocolate sauce about 1 inch apart in cupcake. Drag the tip of a toothpick down through centers of dots to create a heart. Note: You might have to finesse the heart with toothpicks until you get the right shape.
7.  Bake 15-20 minutes, the edges will appear to be set, but the center will still have a little jiggle to it. Pro Tip: How to know when it's done? Jiggle test! Knock the side of the tin, if it jiggles and then stops right away, then it's done (center will firm as they cool).
7.  Let stand at room temperature on a cooling rack until completely cool, then transfer to fridge until well chilled. For best flavor and texture, these cheesecakes are best chilled overnight.

Vegan Chocolate Cake
Recipe adapted from Joy The Baker
Yield: 1, 9-inch chocolate bundt cake

Dessert Fiend Note: I haven't made a ton of vegan desserts, but this one tastes just like the real deal egg version I've made. Score! It also requires little effort. Double score!

Ingredients
2 1/4 cup all-purpose flour
1/2 cup Dutch-processed cocoa powder
1 1/2 cups granulated sugar
1 teaspoon baking soda
1/4 teaspoon baking powder
1/2 teaspoon salt
1 cup warm coffee
1/2 cup plus 1 tablespoon vegetable oil
2 teaspoons pure vanilla extract
handful of chocolate chips

Directions
1.  Place rack in the center of the oven and preheat oven to 350 degrees. Grease a 9-inch bundt pan with cooking spray, oil or butter and dust with cocoa powder. Set aside.
2.  In a large bowl, whisk together flour, cocoa powder, sugar, baking soda, baking powder and salt. In a medium bowl, whisk together coffee, oil and vanilla.
3.  Add the wet ingredients, all at once to the dry ingredients and whisk until just combined. Stir in chocolate chips.
4.  Pour the batter into the prepared pan. Bake for 30-35 minutes, or until a cake tester inserted into the center of the cake comes out clean.
5.  Remove from the oven and allow to cool in the pan for 10 minutes before inverting onto a wire rack to cool completely. Sprinkle with powdered sugar and serve.

Chocolate Crinkle Cookies
Recipe adapted from Simply Recipes
Yield: 50 cookies

Dessert Fiend Note: This is a classic, chewy, chocolate cookie (say that three times fast). Another easy one, but requires you to chill the dough for an hour or so. This recipe can also be halved since it makes a bajillion.

Ingredients
1 cup unsweetened cocoa powder
1 1/2 cups white granulated sugar
1/2 cup vegetable oil
4 eggs
2 teaspoons vanilla extract
2 cups all-purpose flour
2 teaspoons baking powder
1 teaspoon espresso powder (optional)
1/2 teaspoon salt
1 cup confectioners’ sugar

Directions
1.  In the bowl of an electric mixer fitted with the paddle attachment (or beat by hand with a wooden spoon) beat together the cocoa powder, white sugar, and vegetable oil until it comes together into a shiny, gritty, black dough of sorts.
2.  Add the eggs, one at a time, mixing for 30 seconds each. Add the vanilla and beat in thoroughly.
3.  In a separate bowl, whisk together the flour, baking powder, salt and espresso powder if using.
4.  Mix into the chocolate mixture on low speed until just combined.
5.  Cover the dough with plastic wrap and chill the dough for 1 hour or overnight.
6.  Preheat the oven to 350°F and line two baking sheets with parchment paper. Place the confectioner's sugar in a wide bowl.
7.  Using a rounded teaspoon scoop clumps of the chilled dough and roll them into 1-inch sized balls using your hands.
8.  Roll the balls in the confectioner's sugar and place on the cookie sheets (you should be able to get 12-16 on each sheet).
9.  Bake at 350°F for 10-12 minutes. Allow to cool a minute or two on the sheets before transferring to a wire rack to cool completely.

And that's all she wrote! Happy Galentine's-Valentine's Day y'all!

Huge shout-out to Hamee Ha for all the ridiculously good looking photos!

Recipe: Tartine Bakery's Lemon Cream Tart

Tartine Bakery's Lemon Cream Tart will always hold a special place in my heart. It dazzled me the first time I ate it and I was downright tickled when I got the chance to have a hand in making it when I worked at Tartine. This creamy-tangy tart is also one of those "almost too pretty to eat desserts." We would top it with a quenelle of fluffy whipped cream or torched meringue and pretty little edible flowers. I always felt proud to put those beauties in the display case. I'd reckon (yes "reckon," I've been watching too much Westworld) you'd feel pretty proud of yourself too if you made it. Best to try it out and see.

Tartine Bakery's Lemon Cream Tart
Recipe from Tartine Bakery Cookbook
Yield: 1, 9-inch tart

Ingredients
For The Tart Dough
(makes 2, 9-inch tart shells)
1/2 cup + 1 tbsp unsalted butter, room temperature
1/2 cup sugar
1/8 tsp salt
1 large egg, room temperature
1 3/4 cups all-purpose flour

For The Lemon Cream
1/2 cup + 2 tbsp lemon juice
3 large eggs
1 large egg yolk
3/4 cup sugar
pinch of salt
1 cup unsalted butter

Whipped Cream Topping
1 pint Heavy Whipping Cream
2 tbsp confectioner's sugar
OR
Swiss Meringue Topping
3/4 cup plus 2 tbsp sugar
1/2 cup egg whites

Directions - Dough
1.  Using a stand mixer fitted with the paddle attachment, combine the butter, sugar, and salt and mix on medium speed until smooth.
2.  Add in egg and mix until smooth. Stop the mixer and scrape down the sides of the bowl with a rubber spatula.
3.  Add the flour all at once and mix on low speed until incorporated.
4.  On a lightly floured work surface, divide the dough into 2 equal balls and shape each ball into a disk 1/2 inch thick. Wrap well in plastic wrap and chill for at least 2 hours or overnight. (You can also freeze them for future use. They can keep for 3 weeks.)
5.  To line a tart pan, place a dough disk on a lightly floured surface and roll out 1/8 inch thick, rolling from the center toward the edge in all directions. Lift and rotate the dough a quarter turn after every few strokes, dusting underneath as necessary to discourage sticking, and work quickly to prevent the dough from becoming warm. Cut out a circle 2 inches larger than the pan. If the dough is still cool, carefully transfer the circle to the pan, easing it into the bottom and sides and then pressing gently into place. If the dough has become too soft to work with, put it in the refrigerator for a few minutes to firm up before transferring it to the pan. If the dough develops any tears, just patch with a little extra dough, pressing firmly to adhere. Trim the dough level with the top of the pan with a sharp knife or the palm or your hand. Place the pastry shell in the refrigerator or freezer until it is firm, about 15 minutes.
6.  Pre-heat the oven to 325 degrees Fahrenheit.
7.  Dock the bottom of the tart shell or tart shells with a fork or the tip of a knife, making tiny holes 2 inches apart. Place in the oven and bake for 10-12 minutes. The pastry should be lightly colored and look dry and opaque.
8.  Let cool completely on wire racks. The pastry shells will keep, well wrapped, in the refrigerator for up to 1 week or in the freezer for up to 2 weeks.

Directions - Lemon Cream
1.  Pour water to a depth of about 2 inches into a saucepan, place over medium heat, and bring to a simmer.
2.  Combine lemon juice, whole eggs, yolk, sugar and salt in a stainless steel bowl on top of the double boiler. Whisk ingredients constantly for 10-12 minutes until the mixture becomes very thick and registers 180 degrees Fahrenheit on a thermometer (if you don’t have a thermometer, just whisk until the mixture leaves a trail when you move the whisk through it. It should became opaque and pale yellow)
3.  Remove the bowl from over the water and stir from time to time to release the heat.
4.  Meanwhile, cut butter into 1 tbsp pieces. When the cream is ready and cooled, using either a regular or immersion blender, add 1 piece of butter at a time to the lemon mixture, blending after each addition of butter. The cream will become a pale yellow and very thick.
5.  You can use the cream immediately, or store it into an air-tight container and refrigerate for up to 5 days. If you decide to store it for later use, you will need to warm it up again in a bowl over a bain marie until the texture becomes thinner and smoother before pouring into shell.

Directions - Whipped Cream Topping
Whip cream and sugar on high until soft-stiff peaks form.

Directions - Swiss Meringue
1.  Whisk together sugar and egg whites over bain marie until temperature reaches 120 degrees.
2.  Transfer to mixer with a whisk attachment and mix until stiff peaks form

Assembling Tart:
Have the tart shell ready and cool for filling. Pour the lemon cream into the cooled tart shell. Chill the tart until firm, about 2 hours. Top with a quenelle or sexy dollop of whipped cream or swiss meringue. If topping with meringue, hit it with a blow torch for a toasty taste and look. 

Recreating Old Memories: Pumpkin Waffles

'Tis the season for all things pumpkin, my personal favorite fall flavor. One of the best breakfast items I've had was the pumpkin waffle at Rockridge Cafe. It was such a spot hitter. I used to go there when my sis lived a few blocks away and I'll always fondly remember that delectable waffle. Pumpkin season has rightfully inspired me to recreate this delight at home, and if memory serves me correctly, this recipe isn't far off. These are worth the extra effort in the morning, I promise.

Pumpkin Waffles
Adapted from Smitten Kitchen
Yield: 4-6, depending on your waffle iron

Ingredients
2 1/2 cups all-purpose flour
1/3 cup packed light brown sugar
2 1/4 teaspoons baking powder
1 teaspoon baking soda
1/2 teaspoon salt
2 teaspoons ground cinnamon
1 teaspoon ground ginger
1/4 teaspoon ground cloves
4 large eggs, separated
2 cups well-shaken buttermilk
1 cup canned solid-pack pumpkin
3/4 stick (6 tablespoons) unsalted butter, melted
Vegetable oil for brushing waffle iron or cooking spray
Softened butter and a few shakes of cinnamon for topping

Directions
1.  Preheat oven to 200°F and preheat waffle iron. Sift together flour, brown sugar, baking powder and soda, salt, and spices. Whisk egg yolks in a large bowl with buttermilk, pumpkin, and butter until smooth. Whisk in dry ingredients just until combined.
2.  In a mixing bowl with a whisk attachment, whisk the egg whites until they hold soft peaks. Fold them gently into the waffle batter, until just combined.
3.  Brush waffle iron lightly with oil and spoon batter (about 2 cups for four 4-inch Belgian waffles) into waffle iron, spreading quickly. Cook according to manufacturer’s instructions.
4.  Transfer waffles to rack in oven to keep warm and crisp. Make more waffles in same manner.
5.  Top waffles with cinnamon butter.

Recipe: Caramel Pot de Crème

Pot de créme or "pot of cream" is a decadent custard that has the texture of a thick, sturdier pudding. It's hands down my favorite custard dessert, sorrynotsorry créme brûlée. Typically it's topped with a sexy dollop of whipped cream, and boy do I love me a sexy dollop. Truth be told, I haven't met a pot de créme that I haven't liked, and this recipe is no exception. Best part about it is that it only calls for 4 ingredients, that you probably already have. Now you really have no excuse not to try this recipe on for size. 

Happy pot de créme-ing friends!

Caramel Pot de Crème
Recipe adapted from theviewfromgreatisland.com
Yield: 6 small jars

Ingredients
6 large egg yolks
3/4 cup granulated white sugar
2 cups heavy cream (or 1 1/2 cups heavy cream and 1/2 cup whole milk)
1/2 tsp vanilla extract

Optional toppings:
1 cup heavy whipping cream
Maldon sea salt
Blackberries
Shortbread cookie

Directions
1.  Set oven to 325F
2.  Whisk the egg yolks in a small bowl until well blended. Set aside.
3.  In a heavy bottomed sauce pan combine the sugar and 1/2 cup water and stir gently to combine. Over medium heat, simmer the mixture WITHOUT STIRRING until sugar starts to dissolve. Increase to medium-high heat and boil for anywhere from 5-10 minutes, until the sugar syrup starts to brown. The browner the syrup gets, the more flavor you will have in your finished custard. Pro tip: once the mixture starts to smoke (burn), wait 30 more seconds until step 4. Trust me, this will increase the richness of the flavor. 
4.  When the syrup is nice and brown, whisk in the cream (be careful, it will spurt) and continue to stir while you lower the heat to medium. The caramel with be hardened at first and will dissolve as the cream heats. Stir just until all the bits of caramel are dissolved.
5.  Slowly drizzle the cream mixture into the egg yolks, whisking as you drizzle. Continue until all the cream has been incorporated into the eggs and is smooth. Stir in the vanilla extract.
6.  Pour the mixture into 6 small oven safe glasses.
7.  Set the glasses in a baking dish and pour hot water into the dish to come up about an inch or two.
8.  Bake for about 30-40 minutes, until the custards are set on the edges, but still a little wobbly in the center.
9.  Let cool and then refrigerate until chilled.
10.  Serve with one of the below:
- a sprinkle of Maldon sea salt
- a dollop of lightly sweetened whipped cream and Maldon salt
- a dollop of lightly sweetened whipped cream and a blackberry
- go for the full Monty! A dollop of lightly sweetened whipped cream, a blackberry and shortbread cookie crumbles

French themed din? Cue pot de créme. 

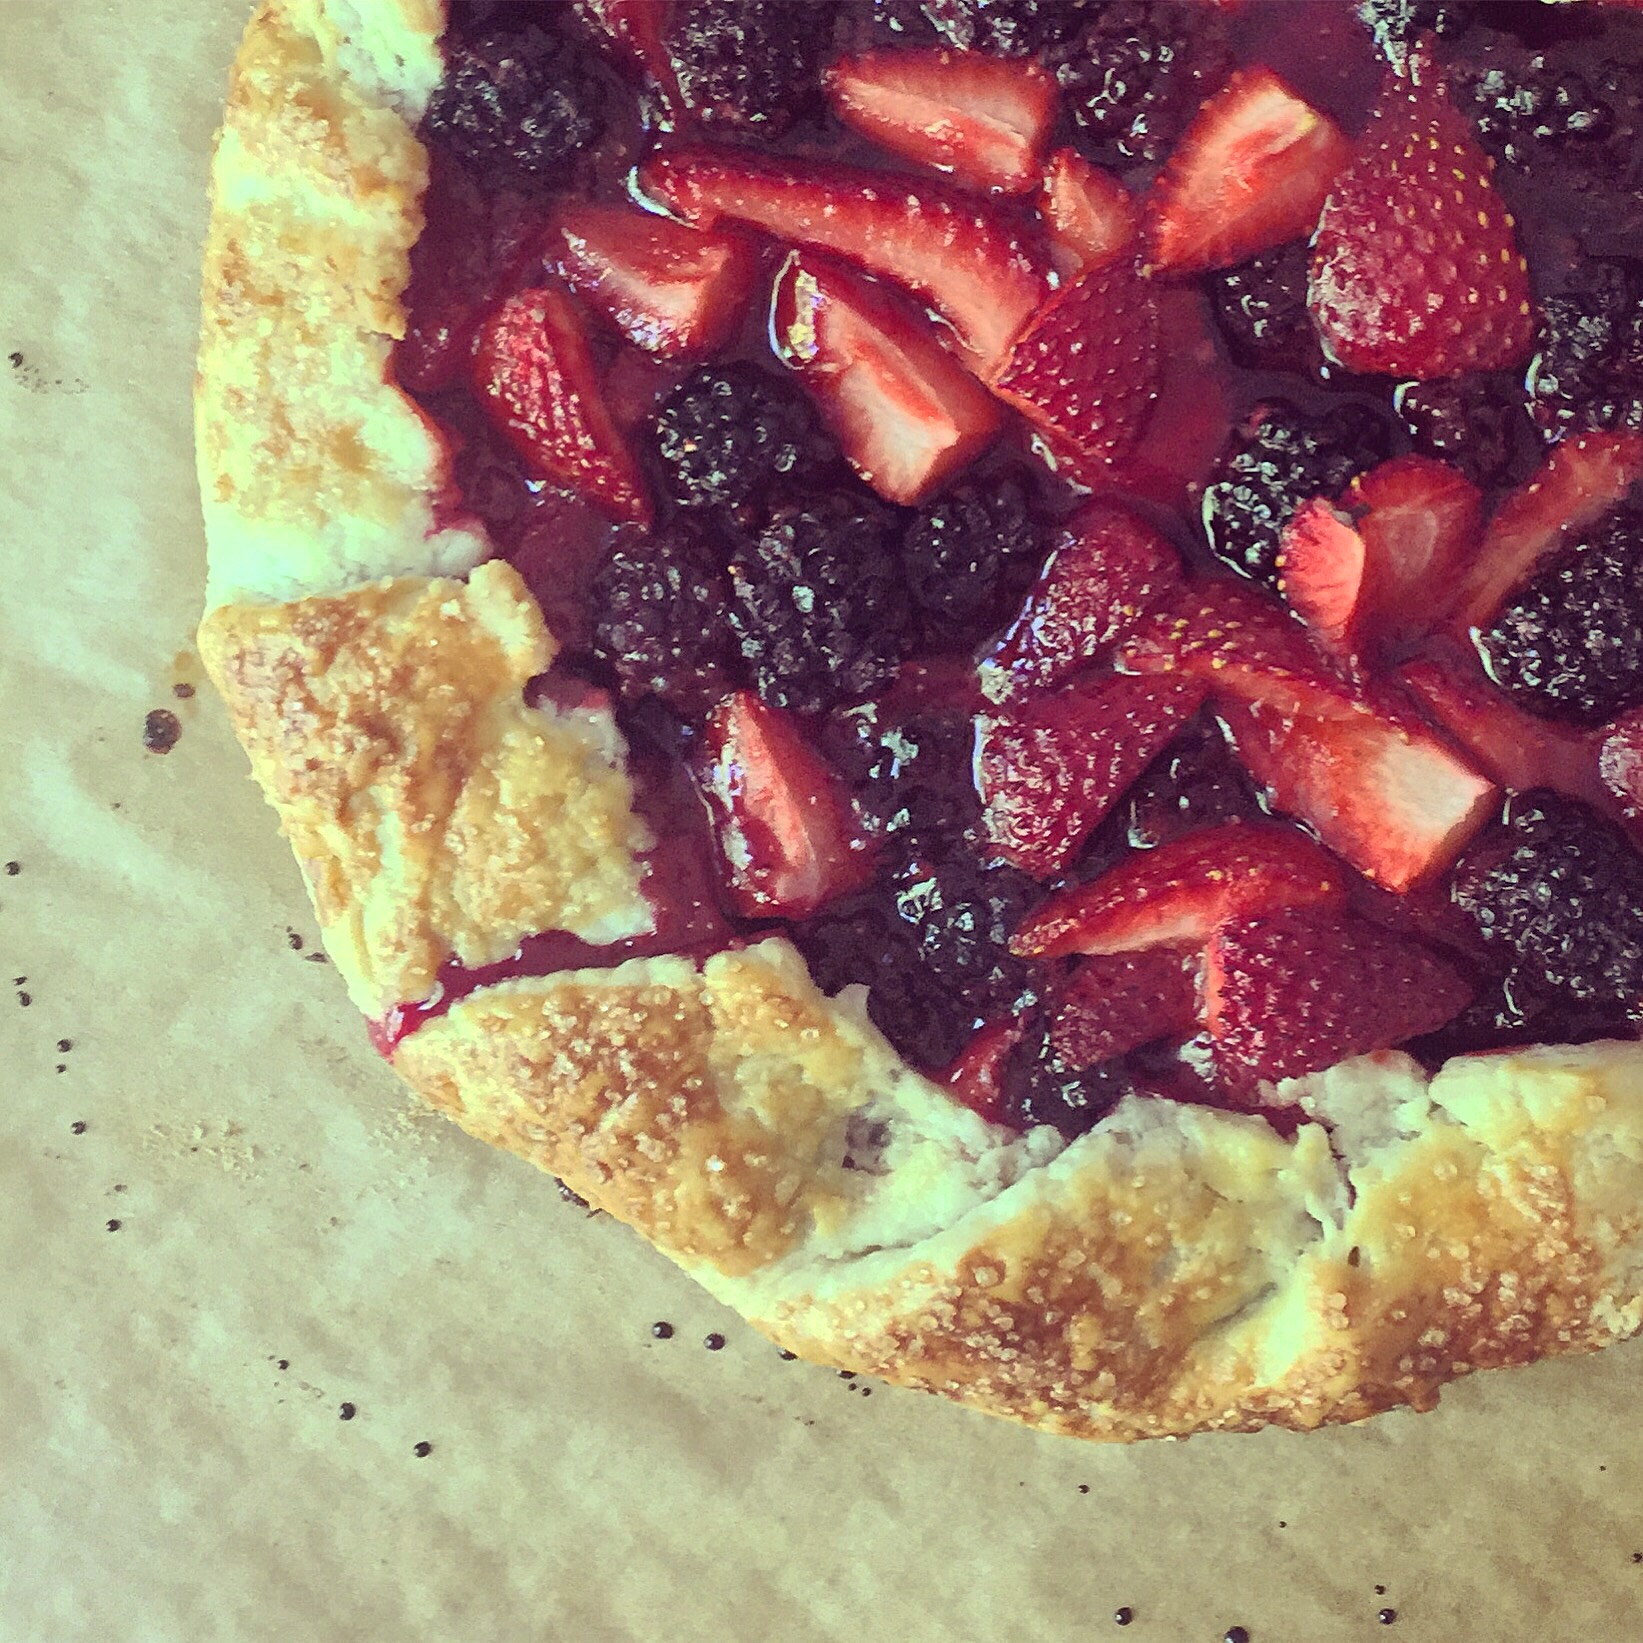
Recipe: Any-Kind-Of-Fruit Galette

Fruit_Galette_Recipe_Blackberry_Strawberry_Dessert_Fiend.JPG

Oh hai there stranger. Been awhile, hasn't it? I almost forgot what your face looked like.

Yeeesh, so did I fall of the band wagon hard or what? I kind of felt like this poor sap. Wish I had a good story to go along with it, but really, I just procrastinated x100 and decided to wait until I felt the urge again, which ended up taking 6 (!) months. But hey, better late than never, right?

So I've GOT to share a dessert with you that I'm currently obsessed with: galettes! Heard of them? They're like pie, but easier to make and rustic AF. Bonus: they look impressive too! I made this puppy most recently for a ladies food-themed dinner; this time around the theme was "stone fruit." Sidenote: you might be asking yourself, "what the devil is stone fruit exactly?" I tell you. It's a fruit with a "stone" inside of it, also known as a "pit." #themoreyouknow

What's damn cool about galettes is that you can use any fruit you fancy in it. The only thing you might have to modify is the cornstarch (if the fruit is super juicy to start with, add more) and sugar (if the fruit is naturally super sweet, use less), that's it though. The rest of the recipe is the samesies.

I think y'all should give this a go because A: stone fruit season is phasing out soon, get it while the gettin's good! B: galettes are rookie-friendly, you seriously can't screw this up, and C: because I said so! (aka my least favorite phrase my dad used to use on me growing up...the worst!)

Guys, it's good to be back. See you real soon. 

Any-Kind-Of-Fruit Galette
Yield: 8-10 servings
Recipe: adapted from A Life Well Lived

Ingredients
For the pie dough:
1 1/4 cup all purpose flour
1 teaspoon salt

1 tablespoon sugar
1 stick cold unsalted butter, cut into cubes
3–5 tablespoons ice cold water

For the filling:
4 cups fruit, sliced (I used 2 cups peaches, 2 cups strawberries)
1/2 cup granulated sugar (use less if fruit is super sweet pre-sugar)
1 Tbs. lemon zest
2 Tbs. lemon juice
2 Tbs. cornstarch (add more if fruit is super juicy on its own)
pinch of salt

For the egg wash:
1 egg mixed with 1 tbs. half and half or water
turbinado sugar

For the topper:
1 pint heavy whipping cream
4 Tbs. powdered sugar
OR
Go à la mode! Vanilla Bean Ice Cream recipe here.

Directions
For the pie dough:
1.  In a food processor pulse to combine the flour, salt and sugar. Add butter and pulse another 10 times or until the butter is the size of peas.
2.  With the motor running slowly add the water and continue for another 20 seconds or so until the dough has come together.
3.  Place dough on a well floured surface and form into a disk shape. Cover and refrigerate for at least 30 minutes.

For the filling:
1.  Pre-heat oven to 400°F.
2.  In a medium bowl, stir to combine the fruit, sugar, lemon zest, lemon juice, cornstarch and pinch of salt.
3.  Roll out refrigerated pie dough until about 1/8 " thick and about 12" in diameter.
4.  Carefully place the fruit mixture in the center of the rolled out pie dough leaving a 2 inch border. Gently fold the dough partially over the fruit mixture pleating the dough. 
5.  Brush the dough with the egg wash mixture then sprinkle with turbinado sugar.
6.  Bake galette for about 30 to 35 minutes or until the crust is golden brown and the filling is bubbling.
7.  Let cool for 15 mins or so before serving.

For the topper:
1.  Whip heavy whipping cream with powdered sugar until soft peaks form.
2.  Top galette with a sexy dollop.
3.  OR, top galette with scoop of vanilla bean ice cream.
4.  Take a combo bite and be happy.

Strawb-Peach Galette à la mode

Recipe: Tartine Bakery's Chocolate Pudding

When I tasted Tartine's Chocolate Pudding for the first time, I thought: "This is how chocolate pudding should taste!" It has the right balance of richness and the texture is velvety smooth. Overall, this dessert just makes you happy. I decided to make this at home on Valentine's Day because chocolate is the thing to eat on this day of love. Why get your romantical chocolate in a heart shaped box when you can get it on a spoon?

This recipe is easy for bakers of all levels (truth!) and is relatively fast. No baking is involved, just some stove-top action. Once you portion it out, it doesn't take long to cool, so this pudding can be in your belly in under a couple hours. #fistpump

If you're looking to step up your pudding game, look no further. Tartine, thanks for nailing chocolate pudding.

Tartine Bakery's Chocolate Pudding
Recipe from Tartine Bakery Cookbook
Yield: 4-6 servings

Ingredients
1 3⁄4 cups (14 oz/425 ml) whole milk
1⁄2 cup heavy cream, plus 2 tablespoons (5 oz/155 ml) heavy cream (plus 1 cup/8 oz for topping later on)
1⁄4 cup (1 oz/30 g) cornstarch
3⁄4 cup (5 oz/140 g) sugar
3 tablespoons (45 ml) cocoa powder
3 large eggs
1⁄4 teaspoon (1 ml) salt
2 1⁄2 ounces (70 g) bittersweet chocolate, coarsely chopped

Directions
1.  Place a fine-mesh sieve over a large heat-proof container.
2.  In a saucepan, combine the milk and cream; heat to just under a boil. Pro Tip: When you start to see a good amount of steam while you're stirring it, you're close!
3.  Meanwhile, in a mixing bowl, combine the cornstarch and sugar; sift in the cocoa powder; whisk until blended.
4.  In another bowl, whisk the eggs with the salt until blended, then add to the sugar mixture and whisk until well combined.
5.  Slowly add half of the hot milk mixture to the egg mixture while whisking constantly. Pro Tip: Don't rush this part or, as my chef has said, you'll make "egg-drop soup!"
6.  Pour the combined egg mixture back into the pan with the rest of the milk mixture; cook over medium heat, whisking constantly, until the mixture has visibly thickened and reads 208° on a thermometer, should take about 5-7 minutes, depending on how cold your eggs are.
7.  Immediately pour the contents of the pan through the sieve. Pro Tip: to help it along, use a small ladle/spatula/spoon to push it through, moving it in a circular motion.
8.  Add the chocolate and let the heat of the milk/egg mixture melt it.
9.  When the chocolate has melted, blend with an immersion blender for a full 5 minutes until no lumps are visible. Stop the blender and scrape down the sides of the container with a rubber spatula here and there.
10.  Immediately portion pudding into individual cups; let cool, and serve at room temperature, topped with whipped cream.
FYI: The pudding will keep, well covered, in the refrigerator for up to 4 days.

Want to get wild and crazy?
• Try adding some cinnamon and cayenne pepper during the immersion blender stage (or earlier, whatevs) to taste and you've got yourself a Mexican Chocolate Pudding! Boom.
• Try adding some mint OR orange extract to taste (start small!) for a mint (or orange) chocolate experience. Blammo.

Recipe: Chocolate Brownie Cookies

Like brownies? How 'bout cookies? If you answered yes to both of these Q's then A: we can still be friends, and B: I've got the perfect mashup dessert for you. Behold: the Chocolate Brownie Cookie!

Picture a bomb and then a grip of chocolate; that's what this dessert tastes like- yes, a chocolate bomb. #acceptablebombjokes It has a chewy brownie texture on the inside but a firmer cookie texture on the outside. I guarantee it will cure any chocolate hankering you could possibly have. Bonus points for an easy to tackle recipe too. 

Fill up your tallest glass with milk and get your chocolate brownie cookie on. 

Chocolate Brownie Cookies
Recipe from foodandwine.com
Yield: 3 dozen cookies

Ingredients
1 pound semisweet chocolate, chopped
4 tablespoons unsalted butter
4 large eggs, at room temperature
1 1/2 cups sugar
1 teaspoon pure vanilla extract
1/4 teaspoon salt
1/2 cup all-purpose flour, sifted
1/2 teaspoon baking powder
One 12-ounce bag semisweet chocolate chips

Directions
1.  In a large bowl set over a saucepan of simmering water, melt the chopped chocolate with the butter, stirring a few times, until smooth, about 7 minutes.
2.  In another large bowl, using a handheld electric mixer, beat the eggs with the sugar at medium speed until thick and pale, about 5 minutes. Beat in the vanilla and salt. Using a rubber spatula, fold in the melted chocolate, then fold in the flour and baking powder. Stir in the chocolate chips. Scrape the batter into a shallow baking dish, cover and freeze until well chilled and firm, about 1 hour.
3.  Preheat the oven to 350° and line 2 baking sheets with parchment paper. Working in batches, scoop 2-tablespoon-size mounds of dough onto the prepared baking sheets, about 2 inches apart. Bake for about 10 minutes, until the cookies are dry around the edges and cracked on top. Let the cookies cool on the baking sheets for 10 minutes, then transfer to a rack to cool completely before serving.

Good to know:
The cookies can be stored in an airtight container at room temperature for up to 4 days.

Need more Chocolate? Say no more.
Recipe: The Best Chocolate Cake Ever
Recipe: Salted Dark Chocolate Cupcakes
Recipe: Mexican Chocolate Chip Ice Cream
Recipe: Cocoa Brownies for a Brownieholic
Recipe: Mint Chocolate Truffles
Recipe: Julia Child and Her Perfect Chocolate Mousse
Recipe: Romantical Chocolate Hazelnut Pots de Creme

Recipe: Roasted Strawberry Ice Cream Sandwiches

Ice cream sandwiches and summer go together like peas and carrots. It's my personal favorite frozen treat, mostly because it's two desserts in one <double fist pump>. Well, it's August so this was my cue to attempt making these puppies for the first time.

Strawberries are so hot right now so it was the obvious choice for the ice cream flavor. I chose this specific ice cream recipe because A: minimal cooking was involved = faster (some ice cream recipes have you make a custard first and then you have to wait for it to cool etc etc) and B: no eggs are involved #peaceoutsalmonella. I've made strawberry ice cream before, sans roasting, but used twice the amount of strawbs. When you roast the fruit, it requires less because it releases some of the water from the berries, giving it a more concentrated flavor. #science

As for my cookie recipe selection, I wanted the cookie to be tasty but understated, a perfect wingman for the ice cream, so I chose a white chocolate chip cookie recipe. You don't want a crispy cookie in an ice cream sandy, so I purposely undercooked them a titch to get that chewy texture.

Pro Tip: When making ice cream, especially in this case, be sure to make it the night before so it hardens in time. Another thing to factor in is the assembly time. The process of putting ice cream between two cookies sounds like NBD, but it's strangely tedious and brought me back to my sculpture class days. I've included my process below to help soften the blow.

Verdict? The strawberry ice cream is my new personal favorite- creamy with a bold strawberry flavor, thanks to the roasting. The cookie is just what I was looking for too: chewy, mellow and kindly lets its ice cream friend shine.

This sando is a real spot hitter for these summer days so go be a hero and make them for your favorite.

Roasted Strawberry Ice Cream Sandwiches
Recipe from foodandwine.com & betsylife.com
Yield: 10 sandos  

Ingredients
For the ice cream
3/4 lb fresh strawberries, rinsed and hulled
2 tablespoons sugar
1 tablespoon aged balsamic vinegar
2 cups whole milk
2 cups heavy cream
1 cup sugar
1 teaspoon salt
2 teaspoons vanilla extract

For the cookies
1 stick butter, room temperature (½ cup)
1/4 cup white sugar
1/2  cup brown sugar
1 egg, beaten
1 cup flour
1/2 teaspoon baking soda
2 cups white chocolate chips OR 1 cup mini white chocolate chips (what I used)

Directions
For the ice cream
1.  Heat oven to 325 degrees.
2.  Toss strawberries with 2 tablespoons sugar and balsamic vinegar, and spread on a baking sheet. Roast in the oven for 30-40 minutes or until soft. Allow to cool.
3.  Once cooled, finely chop, or puree the strawberries using an immersion blender.
4.  In a large bowl whisk together milk, heavy cream, 1 cup sugar, salt, vanilla, and strawberries. Pour mixture into the freezer bowl of an ice cream maker and freeze according to manufacturers instructions.

For the cookies
1.  Preheat the oven to 375°.
2.  In the bowl of a stand mixer cream together the butter and sugars. Add the egg and beat the mixture together into a smooth batter.
3.  Sift the flour and baking soda into the batter and continue mixing until all of the dry ingredients are incorporated. Mix in the white chocolate chips.
4.  On a parchment–lined baking sheet, arrange tablespoon-size balls of cookie dough a couple of inches apart, then freeze for about 10 minutes. (you should get 12 cookies all together). 
5.  Bake the chilled cookies for 10 to 12 minutes. They should seem slightly undercooked on top to get the amazingly chewy texture.
6.  Cool entirely on a rack before making your ice cream sandwiches. 
7.  Assemble your ice cream sandwiches and enjoy. Tips below!

To assemble: 
It's a process to assemble, and it took me several tries until I had some sort of system. Here's my technique.
1.  Hold bottom cookie on the palm of your hand or plate, face down (don't crack it!)
2.  Scoop ice cream with a regular spoon, not an ice cream scooper. Scoop strips (not balls) and layer them in a row as close to the edge as you can get, then repeat the process on top of that row, perpendicularly and so on until you have about 3/4" stack.
3.  Create a <white walker> wall wrapping around the outside of your stack.
4.  Even out the stack o' ice cream as best as you can with the back of your spoon, then place the second cookie on top, face up.
4.  Smooth out the sides of the sando with a butter knife and add additional ice cream to the sides if needed.
5.  Gobble that ice cream sando or put it back in the freezer until you're ready to gobble. 

Recipe: Raspberry Crumb Bars

Myself and two other bakers are signed up to do desserts for my friend's wedding next month. With our baker powers combined we will serve up one hell of a dessert bar. One baker is making the groom's cake/bride's cake (yeah Amy!), the other baker is making a gluten-free dessert and I'm making a grip of cookies and bars. The groom wanted anything peanut butter chocolate (my people) and the bride wanted a fruity number. These delectable Raspberry Crumb Bars may be just the ticket for the bride's dessert.

This recipe slightly cuts a corner by using store-bought raspberry jam, but I'm cool with that. Especially when I need to make 40 of these puppies! Be sure to leave enough time before making these because the dough needs to sit for 30-60 mins. Boo, I know, but it's for good reason.

Now go kick off the weekend with a razzie crumb bar in your face!

Raspberry Crumb Bars
Yield: 10-12 bars
Recipe from Flour by Joanne Cheng

Ingredients
1 1/2 cups (3 sticks/342 grams) unsalted butter
1/2 cup (100 grams) granulated sugar
3 tbsp confectioners' sugar
2 egg yolks
1 tsp vanilla extract
1 1/4 cups (175 grams) unbleached all-purpose flour
1 1/2 cups (180 grams) cake flour
3/4 tsp baking powder
3/4 tsp kosher salt
1 1/2 cups (510 grams) raspberry jam (with seeds). Bonne Maman jam is my personal favorite.
1/4 cup (35 grams) confectioners' sugar (optional)

Directions
1.  Using a stand mixer fitted with the paddle attachment, cream together the butter, granulated sugar, and confectioners' sugar on medium speed for about 5 minutes, or until the mixture is light and fluffy. Stop the mixer a few times to scrape down the bowl and paddle. Beat in the egg yolks and vanilla on medium speed for 2-3 minutes, or until thoroughly combined. Scrape down the bowl and paddle again.
2.  In a medium bowl, sift or whisk together the all-purpose flour, cake flour, baking powder, and salt. On low speed, gradually add the flour mixture to the butter-sugar mixture and then mix for about 15 seconds, or until the flour mixture is totally incorporated and the dough is evenly mixed. Scrape down the bowl again and make sure all of the flour mixture is thoroughly incorporated.
3.  Scrape the dough onto a sheet of plastic wrap. Remove one-fourth of the dough to a separate sheet of plastic wrap. Wrap the remaining three-fourths of the dough entirely in the plastic wrap, pressing down to form a disk about 8 inches in diameter and 1 inch thick. Refrigerate the dough disk for about 30 minutes, or until the dough has firmed up but is still somewhat pliable. Pat the reserved one-fourth of the dough into a small disk, wrap in the plastic wrap, and place in the freezer for at least 2 hours, or until hard.
4.  Position a rack in the center of the oven and preheat the oven to 350 degrees F.
5.  Lightly flour the 8-inch dough disk and two large sheets of parchment paper. Place the dough between the sheets of parchment, and roll it out into a rectangle about 13 by 9 inches and 1/4 to 1/3-inch thick. Carefully peel off the top sheet of parchment. Trim the edges so the rectangle has fairly neat sides. Transfer the bottom sheet of parchment with the dough to a baking sheet. Trim the parchment paper so that it fits the baking sheet.
6.  Bake for about 20 minutes, or until the shortbread is light brown. Remove the shortbread from the oven (leaving the oven set at 350 degrees F), let cool for 10-15 minutes, and then spoon the raspberry jam on top of the still-warm shortbread. Spread it in an even layer with the spoon or with a rubber spatula, covering the surface. The heat of the shortbread should soften the jam enough to make it spreadable.
7.  Remove the smaller dough disk from the freezer and, using the large holes on a box grater, grate it into large flakes and evenly sprinkle over the jam. (I found it easier to grate the dough flakes right over the jam because otherwise they softened and clumped together, making them impossible to "sprinkle.")
8.  Return the baking sheet to the oven and bake for another 20-25 minutes, or until the top is lightly browned. Let cool completely on the baking sheet on a wire rack.
9.  When cooled, sift the confectioners' sugar evenly over the top. Trim the edges again, then cut into bars.

Good to know:
•The bars can be stored in an airtight container at room temperature for up to 5 days.
•Pre-baking, the smaller dough portion can be stored in the freezer for up to 1 month. The larger dough disk can be stored in the refrigerator for up to 5 days or in the freezer for up to 1 month. If the larger dough disk is frozen, thaw it overnight in the refrigerator, then let it sit at room temperature for about 20 minutes before using

Recipe: A Very British Dessert, Scones with Clotted Cream

I think I know why tea time is so popular in England. Two words: clotted cream. I had never experienced clotted C before my recent trip to London. It always sounded strange and unappealing to me, but alas, strange and unappealing it is not! When I first sampled it at Fortnum and Mason's high tea, it was love at first bite. Every following bite HAD to have my new favorite British condiment in it. Sure jam and lemon curd, you guys can come along too, but don't forget to bring your tastier friend, clotted cream, with you.

You might be asking yourself, what the devil is clotted cream? The way I'd describe it is, if butter and whipped cream got together and had a bambino, it would be this. The texture is similar to butter, but it's creamier and tastes nutty. Clotted Cream > Butter? In this case, yes.

I made a batch of clotted cream with some scones (which, lets be honest, are simply a vessel for the CC), when I returned from my travels. The cream was simple enough to make, it just took a couple few 20 hours to make! Yeeesh, I know. It takes forever and a day, but the process requires nothing more than an oven and time.

I encourage you to give it a shot because it's a rarity to find this anywhere in the states. Plus, you'll no doubt feel a bit fancy if you have it on a scone with a cup of tea. Tea cheers <pinkies up>!

One of my best mates on the left, champers in the middle, me on the right.

Scones with Clotted Cream
Recipe from cooking.nytimes.com & cupcakeproject.com
Yield: 10-12 scones, 3/4 cup clotted cream

Ingredients
For the Scones:
3 cups self-rising flour (3 cups all-purpose flour, 1 1/2 tablespoons baking powder and 1 1/2 teaspoons salt can be substituted)
2 teaspoons baking powder
1/4 cup teaspoon salt
1/4 cup sugar
4 ounces unsalted butter at cool room temperature, more for pan, optional
1 cup plus 1 tablespoon whole milk
1 cup dried currants, optional
1 egg yolk

For the Clotted Cream:
1 pint of unpasteurized heavy whipping cream (pasteurized heavy whipping cream is the best I could find, but don't use ultra-pasteurized whipping cream)

Directions
For the Scones:
1.  In a large bowl, sift together the flour, baking powder and salt. Whisk in the sugar. (Or give all the dry ingredients a quick whirl in a food processor.) Cut butter into bits and work it into the dry ingredients with fingertips or a pastry blender, or by pulsing the processor, until mixture is finely crumbly. If using a food processor, transfer mixture to a bowl.
2.  Gradually add 1 cup milk and the currants, if using, and mix with a fork. Knead lightly by hand to make a smooth dough. Wrap in plastic and refrigerate 20 minutes.
3.  Heat oven to 425 degrees. Grease a baking sheet with butter or line it with parchment paper. Roll dough to a 3/4-inch thickness. Use a fluted 2- or 3-inch cutter to punch out scones. Scraps can be kneaded lightly for additional scones. Beat the egg yolk with remaining milk and brush on the scones. Place on baking sheet and bake 10 to 12 minutes until risen and golden brown.

For the Clotted Cream:
1.  Pour the cream into a heavy-bottomed oven-safe pot. The cream should come up the side of the pot somewhere between one and three inches.
2.  Cover the pot and put it in the oven on 180 F.
3.  Leave the covered pot in the oven for at least 8 hours. My 2 cups took 12 hours (until my oven automatically turned off). You’ll know it’s done because there will be a thick yellowish skin above the cream. That skin is the clotted cream.
4.  Let the pot cool at room temperature, then put it in the refrigerator for another 8 hours.
5.  Remove the clotted cream from the top of the pot. The cream that is underneath it can still be used for baking.

Fun Facts:
• British scones are typically less sweet and buttery than American scones. This is because they slather their scones with clotted cream, jam and lemon curd. :-)
• The reason clotted cream hasn't exploded across the globe with popularity is that it has an extremely short shelf life. That's why you can't find it at most grocery stores.
• Fortnum and Mason makes my favorite lemon curd to date. It's life-changing. Snag a jar here.

Recipe: Millionaire's Shortbread (a.k.a. Fancy Twix® Bars)

I'd like the job of naming dessert, because if it were up to me, this dessert would be named "Fancy Twix® Bars." That way, every yammo would easily know what they were getting into; but with a name like "Millionaire's Shortbread," this could be shortbread topped with Benjamins for all we know! Dessert naming aside, this bar is a spot hitter: buttery shortbread layered with chewy caramel and rich chocolate, a triple hitter if you will. Bonus: it's easy to make too!

I chose this specific recipe because it won a contest (who doesn't like winners?), and I've gotta admit, this dessert tastes like victory. Go get 'em.

Millionaire's Shortbread
Recipe from onceuponachef.com
Yield: roughly 40 bars, but it all depends on how you cut these suckers

Ingredients
For the Crust
1 cup all-purpose flour
1/4 cup dark brown sugar
2 teaspoons cornstarch
1/4 teaspoon salt
1 stick (1/2 cup) cold unsalted butter, cut into 1/2-inch cubes
1 tablespoon ice water
1 large egg yolk

For the Caramel Layer
1 (14-oz) can sweetened condensed milk
1/2 cup dark brown sugar
6 tablespoons unsalted butter
2 tablespoons golden syrup (such as Lyle's Golden Syrup) or dark corn syrup
1 teaspoon vanilla extract
Generous pinch salt

For the Chocolate Layer
6 ounces semi-sweet chocolate, broken into small pieces, best quality (my favorite here)
3 tablespoons heavy cream

Directions
For the Crust
1.  Preheat the oven to 350 degrees. Line a 9-inch square pan with aluminum foil, pushing the foil neatly into the corners and up the sides of the pan, using two pieces if necessary to ensure that the foil overlaps all edges (the overhang will help removal from the pan). Spray the foiled pan with nonstick cooking spray or grease with butter.
2.  In the bowl of a food processor fitted with a metal blade, combine the flour, brown sugar, cornstarch and salt; process until well combined and no lumps of brown sugar remain. Add the butter and pulse until a coarse meal forms. Add the ice water and egg yolk and blend until moist clumps form. Dump the dough into the prepared pan and press with your fingers into an even layer (dust your fingers with flour if the dough is too sticky). Pierce the dough all over with a fork and bake until golden, about 20 minutes. Set aside to cool.

For the Caramel Layer
Whisk the sweetened condensed milk, brown sugar, butter, golden syrup, vanilla and salt together in a medium saucepan over medium heat until the sugar dissolves, the butter melts and the mixture comes to a boil. Attach a candy thermometer to the side of the pan and boil gently, whisking constantly, until the caramel is thick and the temperature registers 225 degrees F, about 6 minutes. Pour the caramel over the warm crust; cool for about 15 minutes, or until caramel is set.

For the Chocolate Layer
Place the chocolate and cream in a microwave-safe bowl. Microwave in 20 second intervals, stirring in between, until the chocolate is about 75% melted. Stir, allowing the residual heat in the bowl to melt the remaining chocolate, until smooth (if necessary, place the chocolate back in the microwave for a few more; just be sure not to overheat or the mixture will curdle). Spread the chocolate over the caramel layer. Refrigerate the bars until the chocolate is set, at least 1 hour. Using the foil overhang, lift the bars out of the pan and transfer to a cutting board. Cut into small squares and store in the refrigerator until ready to serve.

Lost this round of Twix Jenga

Recipe: The Best Chocolate Cake Ever

Hi, my name is Courtney and I'm a chocoholic. Sometimes my chocolate hankerings are satisfied with a handful of chocolate chips, but other times I need to go bigger. Like cake bigger. Enter "The Best Chocolate Cake Ever." I made this cake for Mother's Day and it fulfills every cell of the chocoholic in me. In fact, I think it may be the best chocolate cake I've ever made.

The cake portion is moist, fluffy and perfectly chocolatey, while the frosting (an old favorite of mine) is luxurious and decadent, but not over the top rich. Separately they would go swimmingly with another flavor frosting or cake, but together, these two are intoxicating...just thinking about it makes me angry because I don't have a friendly slice of it left to eat.

In conclusion, my friends, if you have a chocolate lover in your midst, make them this cake.

The Best Chocolate Cake Ever
Cake recipe from addapinch.com
Yield: Roughly 12 servings

Ingredients – Cake
2 cups all-purpose flour
2 cups sugar
3/4 cup unsweetened cocoa powder
2 teaspoons baking powder
1 1/2 teaspoons baking soda
1 teaspoon salt
1 teaspoon espresso powder
1 cup milk
1/2 cup vegetable oil
2 eggs
2 teaspoons vanilla extract
1 cup boiling water

Ingredients – Frosting
6 ounces unsweetened chocolate, melted and cooled
4 1/2 cups confectioners’ sugar (no need to sift)
3 sticks (12 ounces) unsalted butter, at room temperature
6 tablespoons half-and-half or whole milk
1 tablespoon vanilla extract
1/4 teaspoon espresso powder

Directions
For the cake:
1.  Preheat oven to 350º F. Prepare two 9-inch cake pans by spraying with baking spray or buttering and lightly flouring.
2.  Add flour, sugar, cocoa, baking powder, baking soda, salt and espresso powder to a large bowl or the bowl of a stand mixer. Whisk through to combine or, using your paddle attachment, stir through flour mixture until combined well.
3.  Add milk, vegetable oil, eggs, and vanilla to flour mixture and mix together on medium speed until well combined. Reduce speed and carefully add boiling water to the cake batter. Beat on high speed for about 1 minute to add air to the batter.
4.  Distribute cake batter evenly between the two prepared cake pans. Bake for 30-35 minutes, until a toothpick or cake tester inserted in the center comes out clean.
5.  Remove from the oven and allow to cool for about 10 minutes, remove from the pan and cool completely.
For the frosting:
Place all of the ingredients in a food processor and pulse to incorporate, then process until the frosting is smooth.

Pro Tips/Facts:
• Always always bake a few mins below the lower suggested baking time. Every oven is different!
• If your frosting is too thin and you've added the max amount of confectioners’ sugar, pop it in the fridge for 15 mins or so to harden up.
• Both the cake and frosting have a bit of espresso powder in it which helps enhance the chocolate flavor. For non coffee fans, the espresso flavor isn't noticeable though. S'all good.

Recipe: Mexican Chocolate Chip Ice Cream

Ice cream is becoming one of my favorite desserts to make. It's pretty low effort because there's zero baking involved and the ice cream machine does half of the work. If you're working off of a solid recipe, you can't lose.

I had an occasion to make festive ice cream this week- it was Taco Tuesday and Cinco de Mayo on the same day. I couldn't pass up the opportunity to celebrate those two, so I hosted a little soirée. I made some tacos (didn't see that coming huh), jalapeño margies and lastly, Mexican Chocolate Chip Ice Cream.

I debated between three different chocolate ice cream recipes, all from my trustee Ben & Jerry's Homemade Ice Cream & Dessert Book. There was "Ben's Chocolate Ice Cream," the rich one, "Jerry's Chocolate Ice Cream," the complex one and "Light Chocolate Ice Cream," the subtle one. I went with my boy Jerry's recipe because it seemed liked a happy medium, not overly rich or weak in the chocolate department. In order to make it a proper Mexican chocolate, I added cinnamon and cayenne pepper to taste. They key is to go heavier on these spices because after the ice cream freezes, those flavors become less intense. The spice proportions I gave you below are rough. For the cinnamon, I added a teaspoon at a time, blended, and tasted until there was a significant hit of cinnamon. For the cayenne pepper, I went shake by shake until it was noticeably spicy, but not bothersome spicy. I wanted that flavor to be more subtle. 

After freezing this puppy for hours and giving it a long awaited taster, I was officially into this ice cream. I loved the rich chocolate with the cinnamon, the crunch of the choco chips and the spicy friend that hit you lightly in the back of the throat <lobbing joke your way>. This ice cream needs to come out more often, not just for Mexican holidays celebrated mostly by frat boys. 

Mexican Chocolate Chip Ice Cream
Recipe based off of Ben & Jerry's Homemade Ice Cream & Dessert Book

Ingredients
2 ounces unsweetened chocolate
1/3 cup unsweetened cocoa powder
1 1/2 cup whole milk
2 eggs
1 cup sugar
1 cup heavy whipping cream
1 teaspoon vanilla extract
1 tablespoon cinnamon
A few to five shakes of cayenne pepper
3/4 cup mini semi sweet chocolate chips

Directions
1.  Melt the unsweetened chocolate in the top of a double boiler over hot, not boiling, water. Gradually whisk in the cocoa and heat, stirring constantly, until smooth. (The chocolate may "seize" or clump together. Don't worry, the milk will dissolve it.) Whisk in the milk, a little at a time, and heat until completely blended. Remove from the heat and let cool.
2.  Whisk the eggs in a mixing bowl until light and fluffy, 1 to 2 minutes. Whisk in the sugar, a little at a time, then continue whisking until completely blended, about 1 minute more. Pour in the cream and vanilla and whisk to blend.
3.  Pour the chocolate mixture into the cream mixture and blend. Cover and refrigerate until cold, about 1 to 3 hours, depending on your refrigerator. I went with I hour and change.
4.  Whisk the cinnamon and cayenne pepper into the mixture, transfer to an ice cream maker and freeze following the manufacturer's instructions. Mine took about 25-30 mins. Add chocolate chips when you are a few minutes away from being done

Recipe: Chez Panisse Lemon Meringue Pie

Ahh the Lemon Meringue Pie. I was first introduced to this pie when I was a little bugaboo. On occasion, my parents would swing by Marie Callender's to pick up a pie for dessert, and 9/10 times, it was Lemon Meringue. It didn't take long for it to became one of my favorite pies- it in fact just took one slice and I was hooked. I love the different textures it has- the smooth tangy lemon custard paired with the melt in your mouth sweet meringue, which is exactly like eating a cloud. Exactly.

This week, I wasn't flying solo in the kitchen- I was able to bake with my favorite baking partner in crime: mi madre. We chose this recipe simply because it's by Chez Panisse, one of the best restaurants in the bay area, 'nuff said. Solid recipe, but it does have a million steps in three part increments, so I recommend reading each step a few times because laaawwwrrd it was confusing. We double-downed and made two of these pie friends, and with our powers combined, they were both a success. #humblebrag

Lemon Meringue Pie
Recipe by Chez Panisse
Yield: 1, 9 inch pie

Ingredients
For the Crust
1 cup unbleached all-purpose flour
2/8 teaspoon salt
pinch of sugar
2 1/2 tablespoons salted butter, cut in several pieces
3 1/4 tablespoons unsalted butter, cut in several pieces
1 1/2 tablespoons solid vegetable shortening
1 1/2 tablespoons ice water (a bit more or less may be needed)

For the Lemon Custard
2 lemons (Meyer or regular, we used regular)
2 eggs
3 egg yolks
6 tablespoons sugar
3 tablespoons salted butter, cut in 3 pieces
3 tablespoons unsalted butter, cut in 3 pieces

For the Meringue
3 egg whites, at warm room temperature
1/4 teaspoon cream of tarter
6 tablespoons superfine sugar
1/2 teaspoon vanilla extract

Directions
For the Crust
1.  In a large bowl, mix flour, salt and sugar.
2.  Using a processor, a pastry blender or your fingertips, cut the salted butter into the dry ingredients until the mixture resembles cornmeal. Add unsalted butter and shortening and cut them in until the lumps are the size of peas.
3.  If you have been using a processor, transfer the mixture back to the large bowl. Sprinkle on the ice water a little at a time and toss with a fork until the mixture comes together in lumps and holds together when pressed. If necessary, add more ice water, sparingly. Avoid kneading the dough.
4.  Gather the dough into a ball, wrap tightly in plastic wrap and chill for at least four hours. Pro Tip: We didn't do this! We were antsy-pantsy. The dough is more pliable if you chill it though.
5.  Roll into a 12-inch circle, 1/8-inch thick, and fit gently into the pan. Trim the edge a half-inch beyond the rim, fold under and crimp or pinch to make a decorative edge. Prick the bottom with a fork. Freeze the shell for 20 to 30 minutes. Pro Tip: We also didn't freeze it! Shrug. #livingontheedge
6.  Preheat oven to 375 degrees. Line the shell with aluminum foil or parchment paper, weight with beans or pie weights and bake for 20 minutes, or until set and dry looking.
7.  Remove the weights and foil, turn the heat down to 350 and continue baking until shell is golden brown, about 12 to 15 minutes. Set aside and allow to cool slightly, but leave the oven on.

For the Lemon Custard
1.  Grate the zest from the lemons into a small bowl. Strain in the lemon juice, then press through as much lemon pulp as possible.
2.  In a heavy saucepan, beat the eggs, yolks and sugar until just mixed. Stir in the lemon juice and pulp, then the six tablespoons of butter.
3.  Cook, stirring constantly, over low to medium heat, until the mixture comes together and thickens enough to coat a spoon. Remove from heat, allow to stand five minutes, then whisk briefly to smooth. 
4.  Spread the prepared filling in the shell and bake for 10 to 15 minutes or until the filling is just set. Remove pie. 

For the Meringue
1.  Bump oven temperature up to 375
2.  Beat the egg whites until frothy, add the cream of tarter and continue beating until rounded peaks form. Beat in sugar and vanilla.
3.  Spread the meringue over the filling, making sure it meets the edges of the crust to make a seal. Swirl in a design with a knife or spatula. 
4.  Bake for about 10 minutes, or until the meringue is lightly browned.
5.  Allow to cool completely, from one to two hours, but do not refrigerate until it's come to room temperature.

Pro Tips:
• How does one store the pie? Make a tent over the pie by using toothpicks and plastic wrap before popping it in the fridge. BOOM.
• If you're short on time or feeling like a lazy sack, buy and use Pillsbury® Refrigerated Pie Crust. It tastes pretty much like the homemade version.

Recipe: Lemon Cheesecake with Gingersnap Crust

Last week, I baked 6 desserts. My social calendar happened to blow up on the same week. A few burfdays to celebrate, a dinner soirée, a bbq and lastly, a Game of <f**king> Thrones premiere party. Each event needed a baked item (or three) by yours truly, and I was happy to oblige. Here's the breakdown of my week o' baking. 

Monday: Dessert menu planning, ingredient gathering
Tuesday: Bake Vanilla Cupcakes with Raspberry Buttercream Frosting
Wednesday: More dessert planning and ingredient gathering
Thursday: Bake Lemon Bars
Friday: Bake Lemon Ricotta Cookies
Saturday: Bake Lemon Cheesecake with Gingersnap Crust
Sunday: Bake Ginger Molasses Cookies and Peanut Butter Chocolate Chip Bars

'Twas a lot of baking, which meant there was a lot of "quality controlling" on my end. #nomnomnom Time to hit the gym and channel McConaughey, he seems to have that workout thing down. Sidenote: Does that guy even own a shirt?

The dessert highlight for me was the Lemon Cheesecake with Gingersnap Crust. It was like a really good handshake- positively satisfying. It was rich, creamy and had the perfect amount of lemon. The gingersnap crust was a compatible compadre too. 

Sigh. If only I loved making cheesecake as much as I loved eating it. It's, unfortunately, a royal pain in the ass to make. It's so high maintenance with it's water bath, two rounds of baking and lastly, the obnoxiously long cooling process that starts outside the fridge and continues inside the fridge. I admit though, I could make my life easier by making a few changes. I could buy a bigger water bath pan (mine is barely a few inches bigger than my cheesecake pan) and I could also not start baking at 8pm. Starting at that hour means I'm up past midnight waiting for that f**ker to cool enough to put it in the fridge. Luckily for my sweet cheesecake, it's always been worth the hassle in the end.

Lemon Cheesecake with Gingersnap Crust
Recipe from Epicurious.com
Yield: 16 servings, but it all depends on your slice size!

Ingredients
For the crust:
2 cups ground ginger snap cookies
6 tablespoons butter, melted (you could probably get away with 4–5 T)

For the filling:
5, 8-ounce packages cream cheese, room temperature
2 cups sugar
1/4 teaspoon salt
7 large eggs, room temperature
3 cups (24 ounces) sour cream
2 tablespoons (packed) finely grated lemon peel
2 tablespoons fresh lemon juice

Directions
For the crust:
1.  Preheat oven to 350°F. Stir cookie crumbs and butter in medium bowl until evenly moistened. Press mixture onto bottom of 9-inch-diameter removable-bottom cheesecake pan with 3-inch-high sides. Bake crust until deep golden, about 12 minutes. Cool completely. Reduce oven temperature to 325°F.
2.  Stack 3 large sheets of foil on work surface. Place same cake pan in center. Gather foil snugly around pan bottom and up sides to waterproof. See my Pro Tips below for another way to waterproof your pan.

For the filling:
1.  Using electric mixer, beat cream cheese in large bowl until smooth and fluffy. Gradually beat in sugar, then salt. Beat in eggs, one at a time. Beat in sour cream, grated lemon peel, and lemon juice. Pour filling into pan.
2.  Place wrapped cake pan in large roasting pan. Pour enough hot water into roasting pan to come halfway up sides of cake pan.
3.  Bake cake until filling is slightly puffed and moves only slightly when pan is shaken gently, about 1 hour 25 minutes. See Pro Tips below on how to tell doneness. Remove cake pan from water bath; remove foil. Cool cake in pan on rack 2 hours. Chill uncovered until cold; cover and keep chilled at least 1 day and up to 2 days.
4.  Cut around pan sides; carefully loosen pan bottom from sides and push up pan bottom to release cake. Place cake (still on pan bottom) on platter. 

Pro Tips:
• Grind the gingersnaps in the processor or place them in a heavy-duty plastic bag and finely crush them with a rolling pin.
• I personally like using crockpot liners to keep the cheesecake pan waterproof vs wrapping in aluminum foil.
• Don't forget to do the "Jiggle Test" I've mentioned before in order to tell doneness of the cheesecake. "Jiggle it, just a little bit!"